Rescue Me!
Posted by Lindsay
From the Workshop, Part One

Today Erin's asked me to talk a bit about rescue operations for your action figures.  Sure, if you pay full price when a figure comes out, or big bucks for MIP (Mint In Package) on Ebay, and keep it carefully, your figures should be lovely for years to come.  But that’s not how we play here at the Clearance Bin.  We often pick up used, loose toys that have seen better days.  (Or toys take an accidental tumble, or...)  If they’re in really bad shape, that’s what’s known as “Custom bait”, and I’ll talk about fully custom figures another time.  But if they’re just a bit scuffed, they can still be display worthy with a little careful work.

**CAVEAT LECTOR.  You follow advice on this page at your own risk.  I’m not responsible if you wreck your figure by accident.**

Common problems with used figures include paint scuffs, general handling/played with dirt, added marks (paint, marker), bent limbs, and plastic scuffs.  Common problems with even new figures include stuck joints and sloppy paint work.  

Rather than try to explain every possible situation, see below for examples of how I’ve fixed several of these issues:

Cleaning and Paint Removal (The Flash)
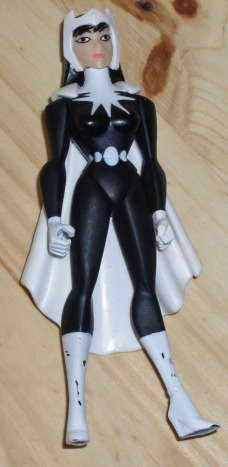
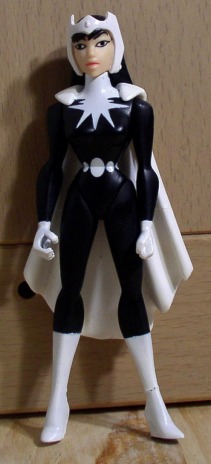
Paint Touch-up (Dr. Light)
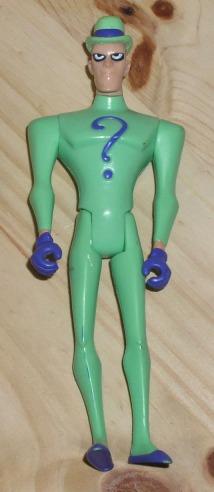
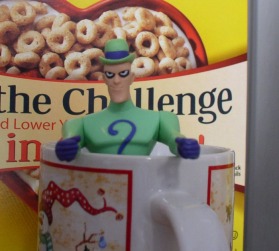
Warped Plastic (The Riddler)
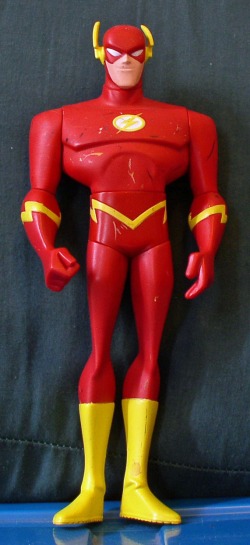
Stuck Joints (Green Lantern)


Cleaning and Paint Removal


Here we have a used Flash 10” Justice League Figure.  It looks like he’s been left in a box with a bunch of other toys.  He’s covered in subtle grime from being handled, and paint marks, rubbed off from other figures.  The first thing I did was look him over.  I’m actually lucky with this guy: both his lightning bolts are still attached, that’s rare for this figure. 


Next I went over him with a gentle soap (hand soap) and warm water.  He actually got quite a bit cleaner, but it’s hard to tell in this picture.  For many used figures, this has been all I needed to do, but those paint smears are stubborn.


However, if you take a good look at Flash, you can see that he’s been cast in red plastic.  The only areas of paint on the figure are the yellow, white and flesh tone. 


This works in my favor, because I can turn to one of my favorite chemicals: acetone. 


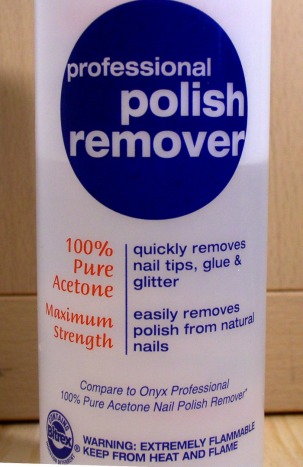
Now before you go playing with chemicals, we should talk.  This stuff evaporates quickly, filling the air with nasty fumes, so keep it covered, and open your windows.  Also note the warning on the bottle: Extremely Flammable.  I do not use this on certain kinds of plastic, especially very hard plastics.  This stuff can alter the finish on figures.  I use this to my advantage when customizing, but if you’re spot cleaning like this, you want to spot test it somewhere hidden first, like the inner back thigh or under the foot.  Justice League guys have been okay for me, but not some of the older Batman Figures.  It works fine on softer vinyl like Barbie heads and My Little Ponies.  If it’s going to melt the surface, it’ll turn it shiny pretty quickly.  You can buy acetone almost anywhere, (I got mine at CVS), look in the aisle with other nail polish removers.

(If you have paint marks on a hard plastic figure, I would try gently scraping with a metal tool.  Clay shaping tools or a butter knife might work.  More drastic discoloration?  As long as you’re trying to go back to the base color, you can try fine sandpaper, depending on the finish.)

The other thing to note is that I mainly use acetone to remove paint from figures in order to repaint them.  That’s why we’re (mostly) only using this on the red surface; it could take the detail paint right off.

One More IMPORTANT NOTE: I am fixing up figures for display in an adult's apartment.  I would NOT EVER use Acetone on something I was planning on giving to a small child.  It SHOULD all wash off, but I wouldn't trust it.

More Info on: Acetone


Okay, that's enough warnings, here’s what happened. 

I took a Q-tip, dipped it in the acetone, and started gently buffing away the stray paint marks.  I used a gentle circular motion, and used as little acetone as I could, using fresh clean Q-tips as they got covered in paint.  This succeeded in removing the paint from all of the red areas.  There are slight discolorations in a certain light, but it’s hard to notice.  Then I was left with a few paint marks on his boots, and on his chin.  I decided to take a chance.  I took a new Q-tip, loaded up, and gingerly went at the painted areas.  What I had to try to do was get up the mark, without taking up the “real” paint.  The acetone dissolved some of the paint right there, so I gently spread the softened paint over the marked spot, and backed off as soon as I could and let it set.  I’m impressed that it worked, but the only mistake left is a slight thinness in the flesh color of his jaw on one side that I only notice because I caused it.  No one else can spot it. 

FYI: Don't worry, that's the most in depth account today.

Paint Touch Up


Poor Dr Light (hero, not villain) has been in a box with a bunch of other figures, and now her legs are all scuffed up.  

A little paint will fix her up. 

White and black are the easiest colors to match; if the color is too specific you might want to hold off, or repaint the entire section.  I used several light coats, sanding gently in between coats with a fine emery paper.  I painted over more than just the spots, so that it would blend into the existing paint, then went over it with a clear matte finish to cover the dull painted look. 

It’s not perfect.  She won’t ever be factory pristine again, but from a foot away she looks fine.

Warped Plastic


I bought this New School Riddler in a lot of loose figures, and his right leg is sadly warped.


I boiled a mug of water in the microwave, took it out, and let him stand in the hot water for around 30 seconds.  When I pulled him out, the plastic of his legs had gotten much softer.  Holding him with a layer of towel to protect my hands from the heat, I straightened his legs, then held them straight under cold water to set the new position. 

This method doesn’t always work on harder plastics, and it can make joints loosen as well.  That means that you may be able to reattach joints that came apart or loosen tight joints, but you should be careful. 

Hot water and then cold water can also be used to restyle synthetic hair, but be careful you don’t melt it!

Stuck Joints

Green Lantern is a brand new figure, See Review, but he came out of the package with some issues.  His elbow joint wouldn’t bend at all.  In cases like this, first you gently apply pressure, because often a joint will yield with a bit of encouragement.  However, push too hard, and it could snap.  We broke the ankle and arm of a brand new NECA Alien that way.  (Luckily, a little Super Glue put it back together, but it still has no articulation there.)

So next I tried gently bending the arm, this time perpendicular to the angle of the joint.  The idea is to loosen the paint which is probably clogging the hinge.  Other methods include holding the joint in question under hot water (See The Riddler above for more on this), and I’ve heard of a “freezer method” but have never used it.  Nothing seems to work for this guy, so I haul out the big gun: My exacto knife.

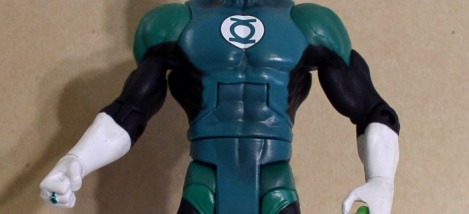
I ever-so-carefully bend the joint enough to gently insert the knife blade wherever I can.  At this point I’m literally trying to cut the paint film that’s dried inside the joint.  I’m not pushing hard, I don’t want to cut the plastic.  I make sure to hit the edges of the pin where I can see paint clogging up the works.  I try the joint again, and it starts working.  He’s fine.  Sometimes this method causes the figure to lose small paint chips, so think about how important the articulation is to you before you go crazy.


In Conclusion...


I hope I gave you some idea of the methods you can try to rescue beat-up figures and give them a new life in your display. 

I’ll be back soon with some thoughts on the more advanced step: Making figures better than they started out.

For more ideas, you can ask the wisdom of the internets, or head over to the Workshop and ask me!